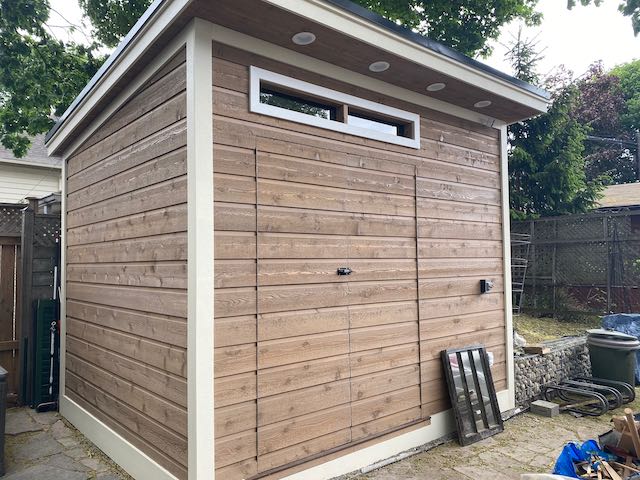
Our back yard transformation began with the demolition of our +30-year-old cedar shed and construction of a big, beautiful new Urban Studio from Summerwood. We managed to snag it at a Black Friday discount in November 2020.
Picturewise, this is a long post! Here’s the TL:DR. We’d thought about a new shed for a long time. Summerwood offers three ways to buy them. Lowest priced: a full DIY kit of pre-cut wood. Highest priced: they build it for you. We chose the middle: DIY assembly of (mostly) factory-built components. Cons: It would have been so much faster to have had the experts build it. Pros: It reduced our costs and we could customize certain aspects. Result: Either way, now it’s done, we’re super happy.
First, we cleared the site
The maple tree that planted itself behind the old one had been gradually pushing our old shed over. A “temporary” fabric shed at the back of the driveway – temporary for at least ten years – told us we needed more space. As we no longer parked in our drive, for many reasons, moving a new shed there was a much smarter use of a small city lot.
So, starting in February 2021, the old shed we’d built (and when I say “we,” know it means Mr. TG) came down. Just as in our front yard reno almost 10 years ago, our goal was to have as little waste as possible. All the old cedar framing, siding, and metal roofing that could be carefully salvaged from the shed was set aside for other projects. You’ll see them in other posts. If you do this, prepare for a slower demolition than one involving a sledgehammer and a waste bin.

In March, they delivered the shed
The driveways in the Old City of Toronto were designed for Model Ts, not today’s wide chassis cars. We’d worried the materials wouldn’t fit, and where we’d put them if they didn’t. Plus, I’d planted snowdrops in the paving. Would my babies get squished? All these frets were unnecessary.
These guys have delivered a few sheds in their career. The overhanging branches and our approx. 7.5′ (just over 2.25 m) driveway were no obstacle. If I wanted someone to play the midway claw machine game for me, I’d pick him any day.
Note that ours is a shared driveway. Throughout the construction, we needed to minimize the mess and inconvenience for our neighbours. At this stage, we tried to unpack the skid quickly so they could get strollers, bikes and people in and out safely. We’ve always been blessed with the best neighbours in the world, but being good neighbours, too, was essential.
Building starts with the floor
In building a firm foundation, we didn’t want to have to underpin, frame and pour a concrete slab. Instead, we looked for a product that would be permeable and easy to work with. Googling uncovered Core Landscape Products, a supplier in B.C. that offered a solution that would bear the shed’s weight.
It’s a grid system of recycled polypropylene designed to fill with gravel, typically for permeable driveways. A chat with the company assured us it would work for our shed. They steered us to an option which was less costly than the one we’d thought.

We’d removed the previous limestone crazy paving which sat on a long- and well-compacted layer of limestone grit, meaning that the site had no danger of subsiding. Still, we had to tweak the grading, assisted by 6-foot spirit level at every stage.
The grid was laid over a bed of gravel, then gravel added to fill it. The product bottom comes attached to landscape cloth – yes, there is a legitimate purpose for landscape cloth! – so the gravel doesn’t stray. Edging provided locks the system in place.
Then Mr. TG and our son followed the Summerwood instructions to build the floor. The kit’s base came in two pre-built halves which were joined before adding flooring and kick-plates.
Erecting the walls
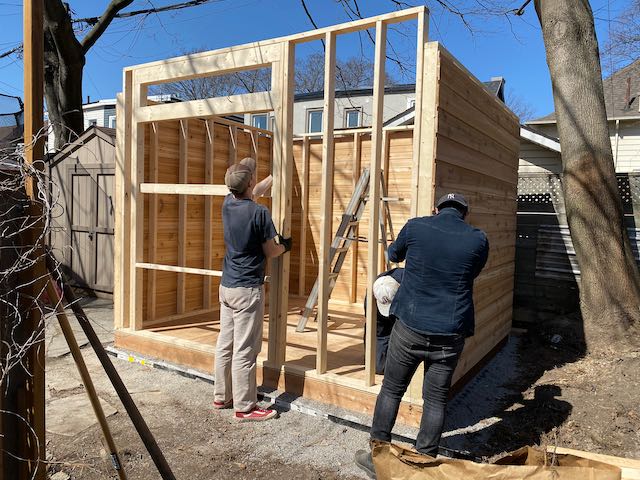
Moving them was the trickiest part of putting up the walls. They were big and they were heavy! Our tiny yard and shared drive, jammed on our side with salvaged pavers and garden detritus, gave no wiggle room. A trolly for moving heavy furniture was a smart buy. The orange straps for lifting heavy stuff, a previous purchase, were awkward here and abandoned after the first try.


The fourth, front wall was much more DIY. While the framing arrived in two assembled portions, hanging the door and installing the facing is very hands-on work. Great for anyone who loves a challenge. Fortunately, that’s Mr. TG.

The documentarian (me) was otherwise occupied when the doors went up. Each side is pre-framed and attached with sturdy piano hinges. Then the planks were cut to fit and hammered in. Mr. TG, who firmly believes “a man can never have too many clamps,” used them frequently throughout construction. Here, they subbed in as spare hands to hold things level.
The glassed window, which came as one pre-trimmed unit, fit neatly into its slot.
Building the roof, Part 1
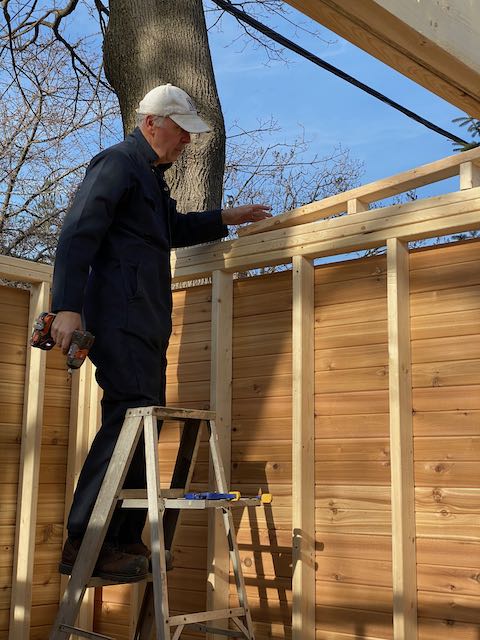
Like the floor, the roof comes framed in two sections. But first two wedges of framing must be built to support the slanted roof. Some of the pieces came pre-cut, but there was some confusion about which went where. As you can see, logic won out.

Good spatial awareness is useful in bringing the pieces through the door opening right way around, and flipping them into position. One of my contributions was to suggest using our multi-position ladder to create a platform, and Mr. TG used scrap to create a lower one. This gave our builders (including, now, our son-in-law) a secure, two-level support to stand on as they lifted.
Building the roof, Part 2
Adding the plywood was fairly quick. But finishing the roof ended up being one of the last steps completed due to the weather. We needed a stretch of good weather to be able to apply the special adhesive and membrane. Spring 2021 did not cooperate. We had to top the shed with multiple tarps to keep out the rain till the time was right. When that happened, the maples were flowering. A few maple flowers were unavoidably fossilized in the adhesive. So it goes.

Meanwhile, the last wedges of cladding had to be applied to the sides, which required precision cutting. Luckily, Summerwood was not stingy with materials, so there was a decent margin for error (that also luckily never happened).
The kit also came with pre-cut short pieces for the side soffit. That’s when we realized that the roof had been installed upside-down. The additional pieces on the side that we’d assumed were reinforcement for the roof were actually there to attach the side soffits to! How would we fix it? Take it all down and start again? I don’t think so! Run the soffits lengthways instead of side-to-side. Well the picture above shows that we went with side-to-side, made possible because Mr. TG added supports for them.
The finishing touches
Summerwood provides a warranty for the shed, but the condition is that the raw cedar be painted or stained within 60 days of delivery. Again, the weather was our enemy, with lots of rain. Under the circumstances, the company did offer us an extension. But we managed to squeak in under the wire anyway. We wanted to get it done!
The delay gave time to choose a colour. It’s a big shed in a small yard, so too bold a colour scheme might overpower the space. We went with a tan in a water-based, semi-transparent stain (WoodScapes from Sherwin-Williams) that promised UV and mildew-resistance. Tan also works with the blue-stained cedar on our rear extension, and the white trim was also painted to match the window trim on our house. The man-made trim is rot-resistant.
Our other neighbour, M, paints for a living and suggested strongly that we should treat the wood inside, too, to avoid cupping. We used a clear urethane, and painted the floor for durability with leftover grey floor paint.
I couldn’t wait to claim my space for garden tools, conveniently by the door.
From beginning to end
Above, father and son stand before the almost-finished shed they’d built together. (The pot lights above them are one of the custom features Mr. TG insisted on adding.) Below, he’s building the old shed with the help of my father, who passed away in 1993. I love that continuity. And I love the way our old shed has been multiply reborn in our rejuvenated space.


All this has been simply meant to share our shed story, hoping it will help you in your own. Overall, our experience with Summerwood was very positive, although a few of the instructions could have been clearer or more detailed. Perhaps not for a contractor, but certainly for an avid and experienced but non-professional builder. Nevertheless, as I said, logic won out.
Clamps, a heavy-duty brad* nailer (the brads Summerwood provides are commercial-grade, not wimpy little consumer versions), and battery-operated power tools with lots of spare batteries were invaluable. *Brads are like one-sided staples, useful for quickly tacking materials in place.
The shed accounted for 65% of our $20K budget, but was certainly worth everything we put into it.
What do you think?


9 comments
That’s a pretty amazing shed!!! Mr.TG and son did a great job.
Thanks, Betty, they sure did!
Love this shed Helen and will tuck this away in my files as a recommendation for clients. Thank you for sharing!
You are quite welcome, Alexis! Glad it helps.
Helen…It’s fantastic, beautiful design and so great to see it from start to finish!
It was an amazing process to document, Kim. So happy it’s finished!
Helen this is an urban chic ? she shed ? LOL .. It was quite the journey to have it come together but wow ! it is gorgeous .. could be guest quarters if you really emphasize how much man and woman power came together to have it built ? LOL
Having a new spot on shed puts spring in a gardeners step, so enjoy !
Joy, I was thinking that if we ever moved, the new owner could use it as a studio. One thing I forgot to mention is that it’s just a few square feet smaller than a structure that would need a permit.
Helen – thank you for sharing your shed building experience. I love the style and finishes – and your comments on things to look out for in the process.